
Below are the processes of pulling a shot of espresso & steaming the milk:
Espresso Shots
- Remove the group handle from the machine & knock out any existing coffee puck.
- Wipe out the filter basket with a cloth, removing any old grind remaining.
- Purge the coffee head for 1-2 seconds (run some water).
- Place the group handle under the grinder – grind the 22-23g dose.
- Slide under the auto tamp & wait 3 seconds before removing. Wipe off any excess grind from around the sides. NOTE: If no auto-tamp is available and you are manually tamping, be sure to tap the group handle on the tamper mat to settle the grinds in the filter basket, and then tamp firmly and evenly with your shoulder pushing down.
- Preheat the group head for 1-2 seconds (run some water).
- Place into the machine & press the button to begin the extraction – It is important that you press the button to extract within 5 seconds of placing the group head into the machine (If the coffee sits for too long before being extracted, the heat from the machine will start to burn the top, therefore making the coffee taste bitter.)
- After extraction, remove the group head & wipe out + purge the head before starting the process over, or place it back into the machine cleaned and ready for the next coffee.
- Always leave the group heads in the machine when not being used. If they sit on the tray they will lose their heat, which disrupts extraction times. It also helps keep the seals from drying out & cracking.
Steaming Milk
- Before using the steam wand for milk, ensure it has been wiped over with no old milk residue on it.
- Point the wand into the middle of the tray and turn it on for 1-2 seconds to release any built-up water/old milk inside.
- Fill your milk jug up to the desired level for the size of the jug you are using. (The general rule is within 1 cm above or below the start of the spout). If there is too much it will overflow while you are steaming the milk. If it is underfilled the head will be too close to the bottom of the jug & cause too many bubbles.
- ALWAYS RINSE THE JUG BEFORE EVERY USE –
- Place the head of the wand so that it is just submerged (covered by) the milk.
- Turn the steam wand on fully. If you only turn it slightly, you will not get enough pressure for the milk to swirl in the jug.
- Foam is caused by the addition of air into the milk from the steam wand, then the fusing of it with the milk. If no air is let in, there will be no froth.
- The amount of air let in will decide how much froth is able to form during the steaming process.
- It is important that the air is let in as early as possible. It needs time to blend with the milk. If there is not enough time for it to blend, there will be lots of bubbles left on top of the milk. This also means the texture won’t get a chance to form properly.
- Once the air has been let in it is important to make sure the milk is swirling in the jug. The steam wand position is important for this. (See photo reference below)
- Slowly bring the jug down until you hear the hissing of the air being let in – within 1-2 seconds of beginning to steam.
- Let the desired amount of air in for the coffee you are making. Below are time guidelines. You will work this out with practice.
- Flat White: 1-2 seconds.
- Latte: 3-4 seconds.
- Cappucino: 4-6 seconds.
- It is important to keep the milk cold that you are using to steam. If it warms up to room temperature prior to beginning, you are cutting down your time to let the air blend with the milk to create a smooth texture.
- For things like hot chocolates, mochas & so on, froth as if for a latte.
- Once you have let the air in, submerge the wand head again below the surface. Do not fully submerge the entire wand, you want the tip sitting about halfway down the jug.
- Turn it off once you reach temperature & check it with a thermometer if unsure.
- Wipe over the wand head to remove milk residue & turn it on again for 1-2 seconds to remove any remaining milk left inside.
- If there are a few surface bubbles, knock the jug on the bench a couple of times & swirl with your hand to leave the top silky smooth.
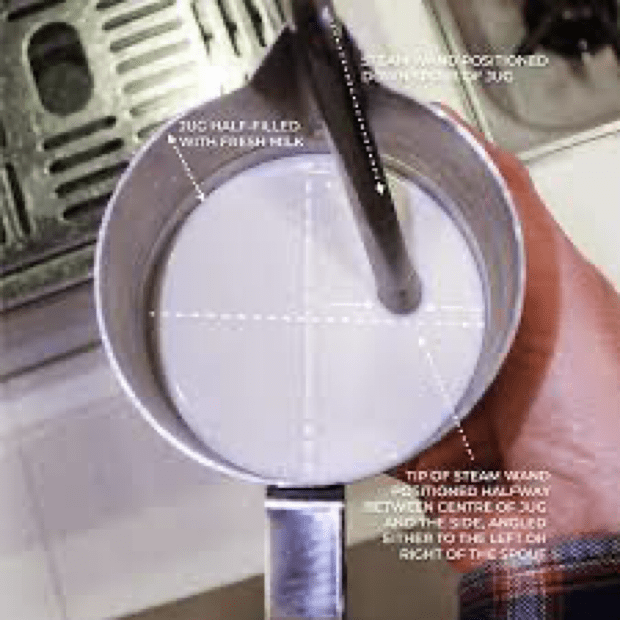
Swirling Position
- The wand can be on either side as long as it sticks to this guideline. You will find what is comfortable for you depending on what your dominant hand is etc.
- When letting air in – don’t move the wand. Have a firm hold on the jug with 2 hands & lower the jug instead.
- It is important to use the spout as your support. This acts as a pivot point so you are able to move the jug as required without disrupting the position.
- It is easy to slip out of position if you use the rim of the jug & make any sudden movements from heat, being bumped etc.
